📘 User Guide
1. Finding an item code
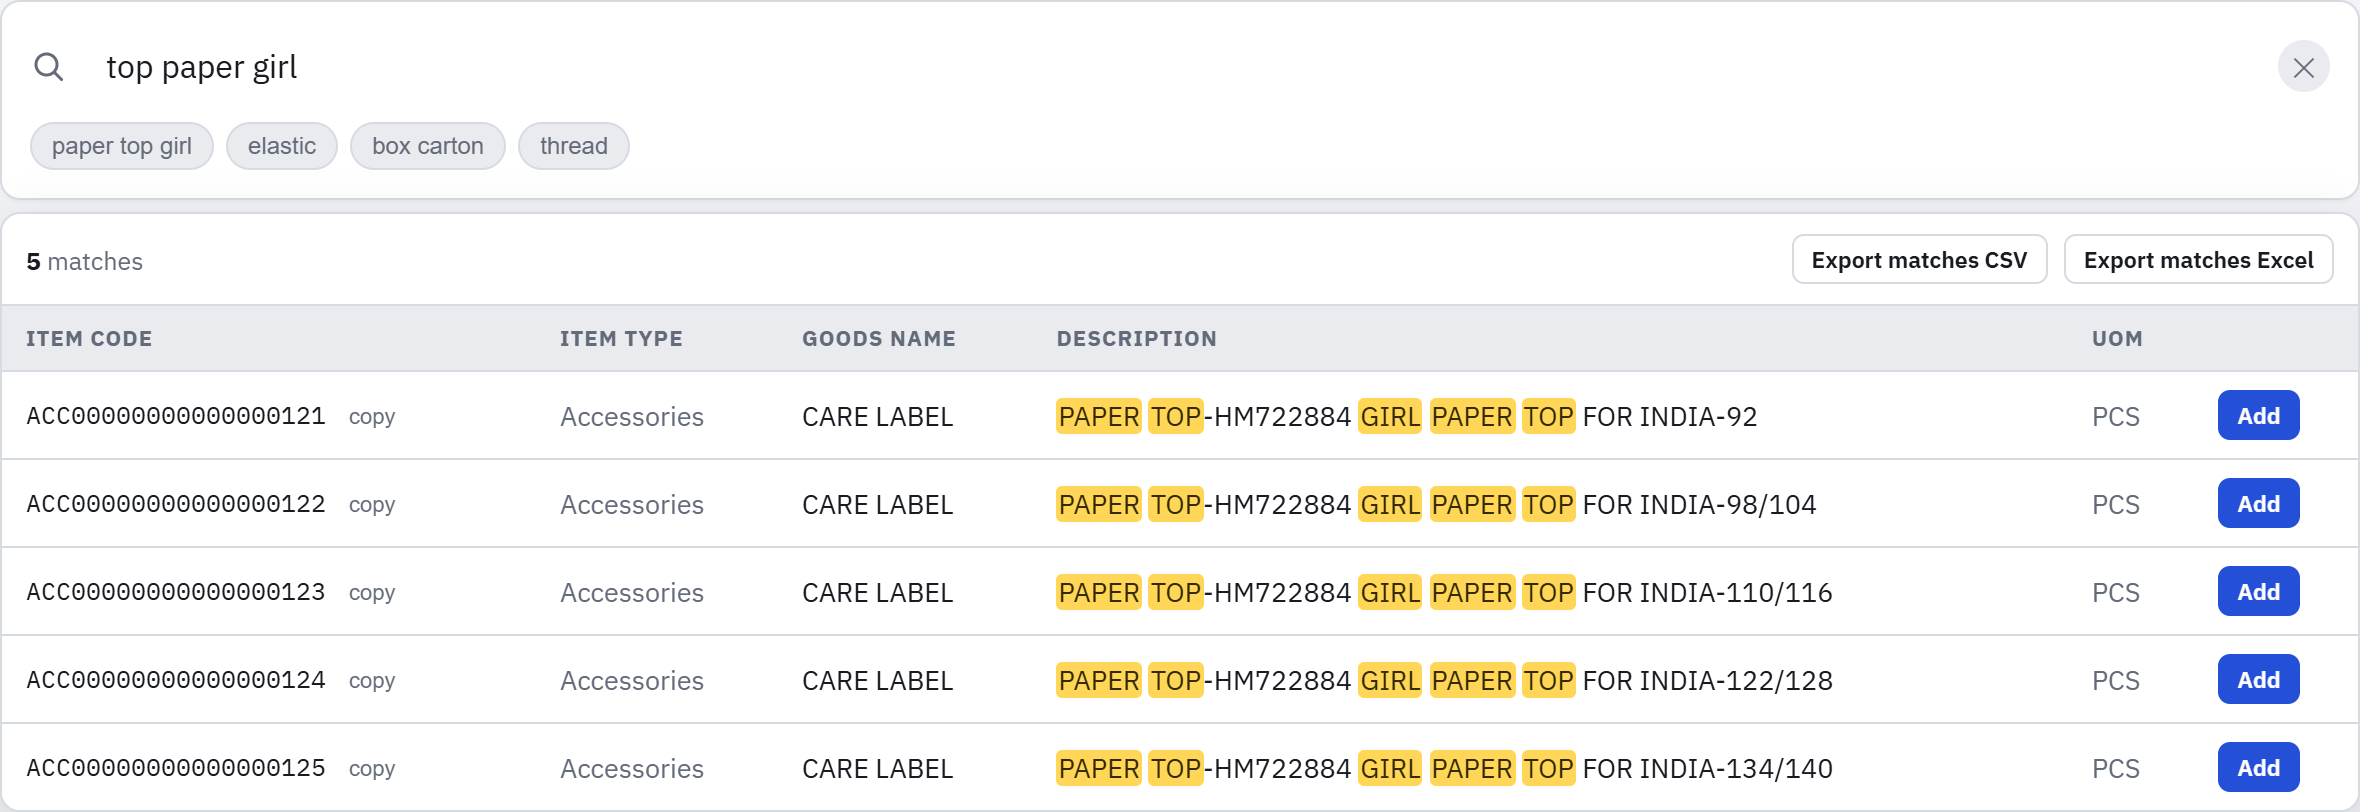
Click the big search box at the top of the page. Start typing any word — the item type, the goods name, part of the item code, or part of the description. You do not need to type the whole word or spell it perfectly.
Example: typing top paper girl will find an item even if its description reads "PAPER TOP ... GIRL ..." — word order doesn't matter.
A list of matching items drops down right under the search box as you type.
2. Adding an item to your sheet
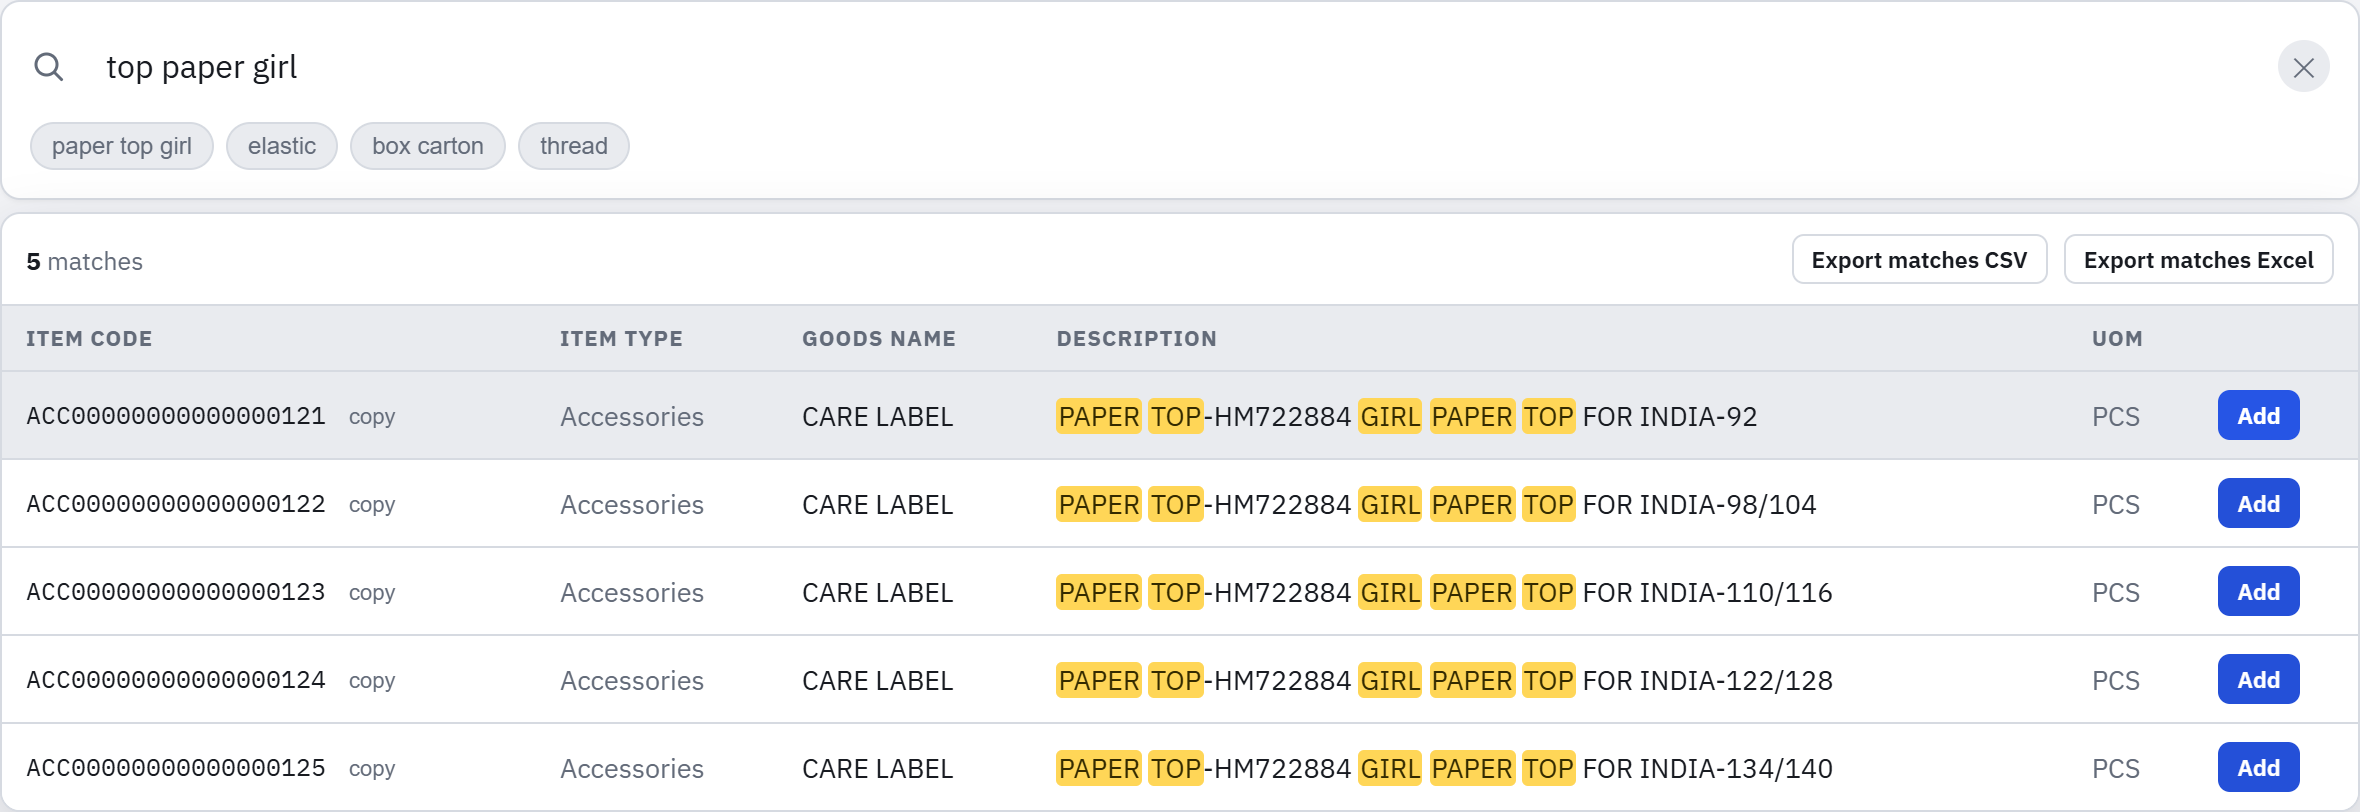
In the dropdown list of search results, every row has an Add button on the right. Click it and that item is added as a new line in your Booking / PR sheet below.
You can add as many items as you like, one after another — the search box stays open so you can keep searching and adding.
There's also a small copy link next to every Item Code if you just want to copy the code itself, without adding it to your sheet.
3. Adding a blank row yourself
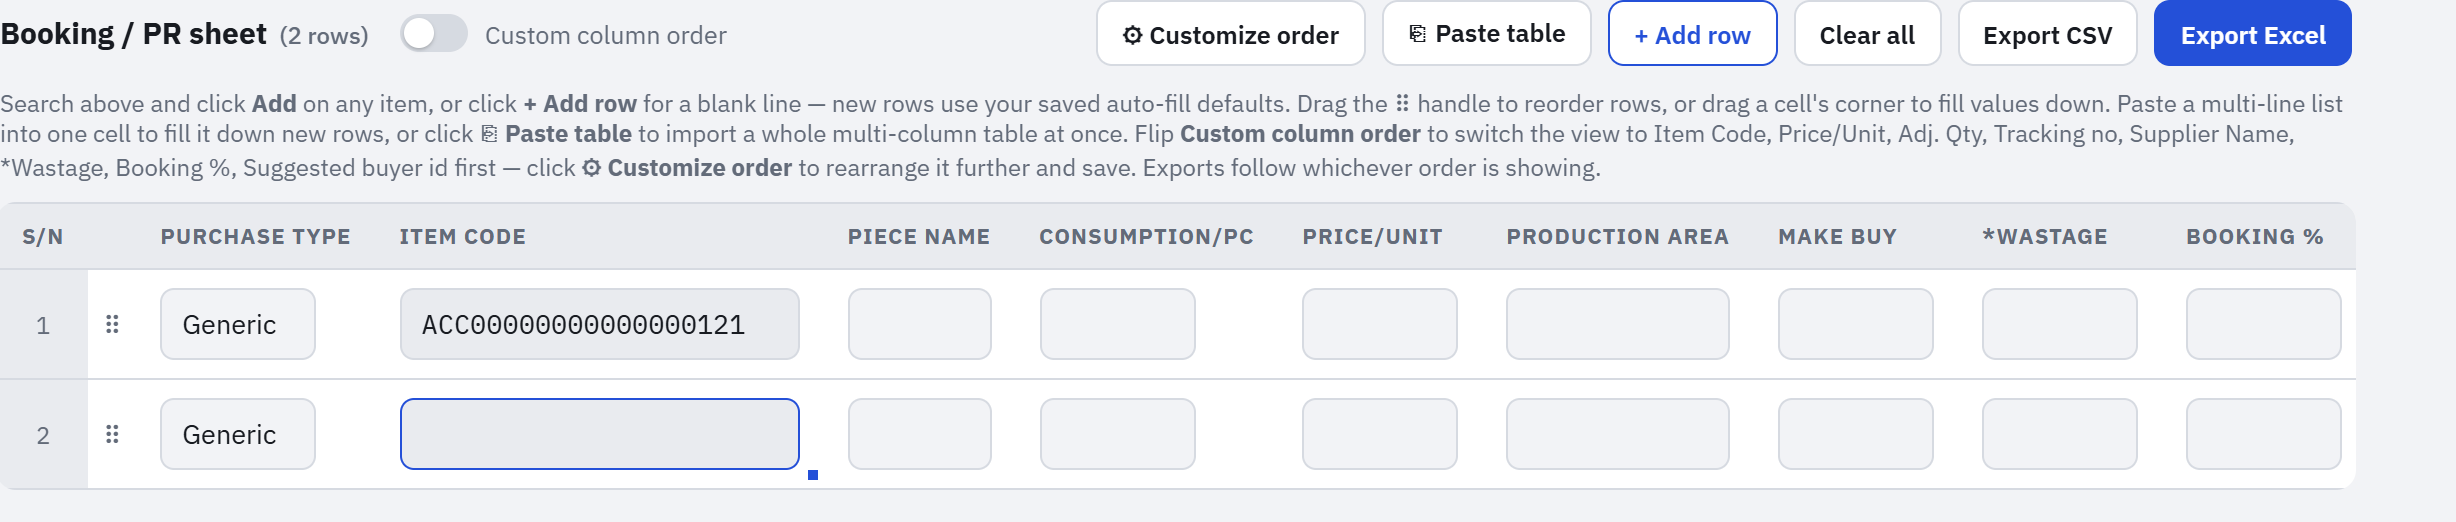
Don't want to search? Click + Add row above the sheet. A new empty row appears, ready for you to type into — the Item Code box is selected automatically so you can start typing right away.
Tip: if your cursor is inside a row when you click + Add row, the new row appears right after that one — not always at the bottom.
4. Editing any box in the sheet
Every box in the Booking / PR sheet can be typed into directly — just click it and type. There is nothing to save; your changes are kept automatically as you go.
5. Copying one value down many rows (the fill handle)
Click into any filled-in box. A small square appears at its bottom-right corner. Click and hold that square, then drag your mouse down over the rows below — release, and that same value is copied into every row you dragged over.
This works for any column — price, production area, supplier name, anything.

6. Pasting a list of numbers into one box (e.g. tracking numbers)
Copy a column of numbers from Excel, an email, or anywhere else. Click into one box in your sheet — for example the first empty Tracking no box — and paste (Ctrl+V, or Cmd+V on Mac).
Instead of dumping everything into one box, each value lands in its own row, starting from the box you pasted into. New rows are added automatically if you don't have enough yet.

7. Pasting a whole table at once
Have a full table copied from Excel, an email, or a PDF — several columns and rows at once? Two ways to bring it in:
A. Paste straight into the sheet — click into any box and paste. It fills across the columns and down the rows starting from that box, exactly like pasting into Excel.
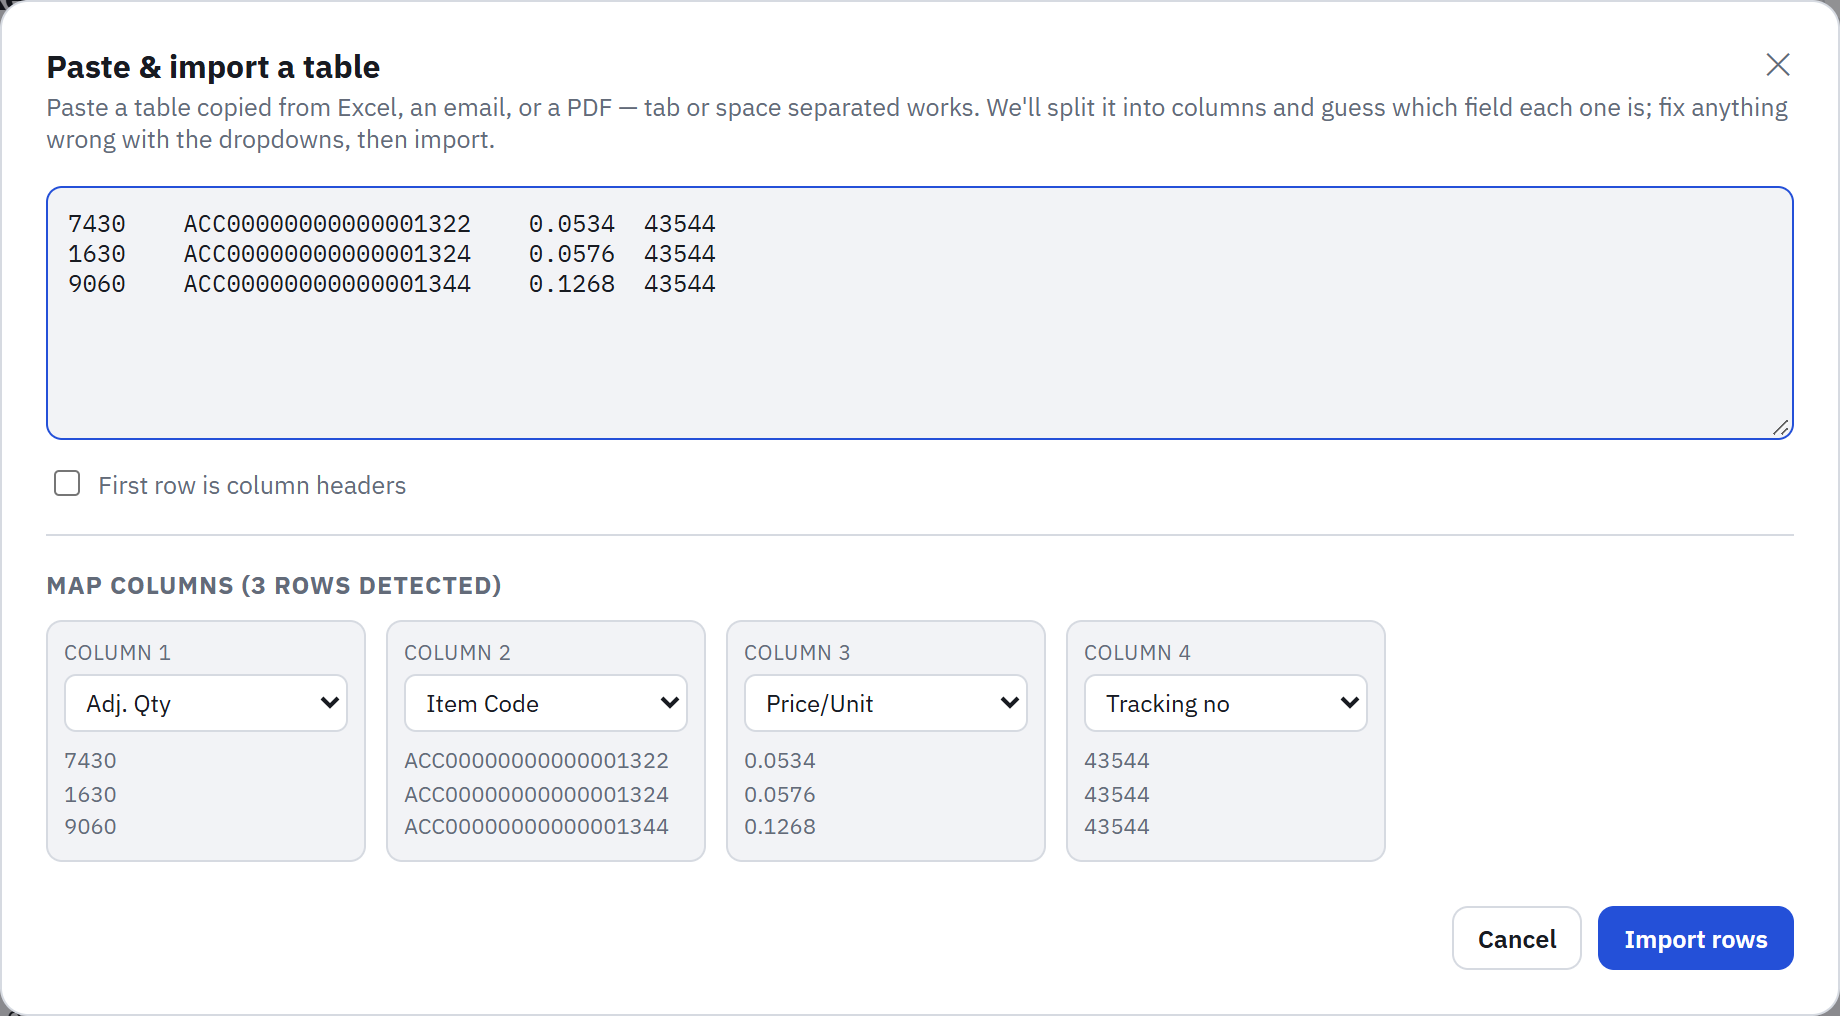
B. Click ⎘ Paste table — opens a box where you paste your table, and for every column it guesses which field it belongs to (Item Code, Price, Tracking no, etc.) — you just check the guesses and fix any that are wrong, then click Import rows. Good for messy or mixed-up tables.
8. Reading a table from a picture or screenshot (📷 OCR)
Only have the booking details as a screenshot, a scanned page, or a phone photo? Click 📷 OCR above the sheet.
Step 1 — Click to choose the image, drag it in, or press Ctrl+V to paste a screenshot. (Pressing Ctrl+V with a screenshot anywhere on the page opens OCR by itself.) JPG, PNG, WEBP, BMP, GIF, HEIC (iPhone) and TIFF all work.
Step 2 — It starts reading straight away. Small, blurry or low-resolution pictures are enlarged and sharpened first, read three times and the readings compared; tilted photos are straightened. Tables come back as real rows and columns — even cells with several lines of text.
Step 3 — Look at the yellow cells: those are the ones it isn't sure about (hover one to see why). Double-click any cell to correct it.
Step 4 — Take what you need:
- Click a cell, drag across several, or click a column letter / row number to select a whole column or row — then Copy selected (or Ctrl+C).
- Copy whole table copies everything — it pastes into Excel as proper columns.
- The Text tab has everything as plain text; ⬇ CSV / ⬇ Excel download the table.
- Add to booking sheet ➜ sends the table (or just the cells you selected) into the Paste table screen — check the column names it guessed, then import.
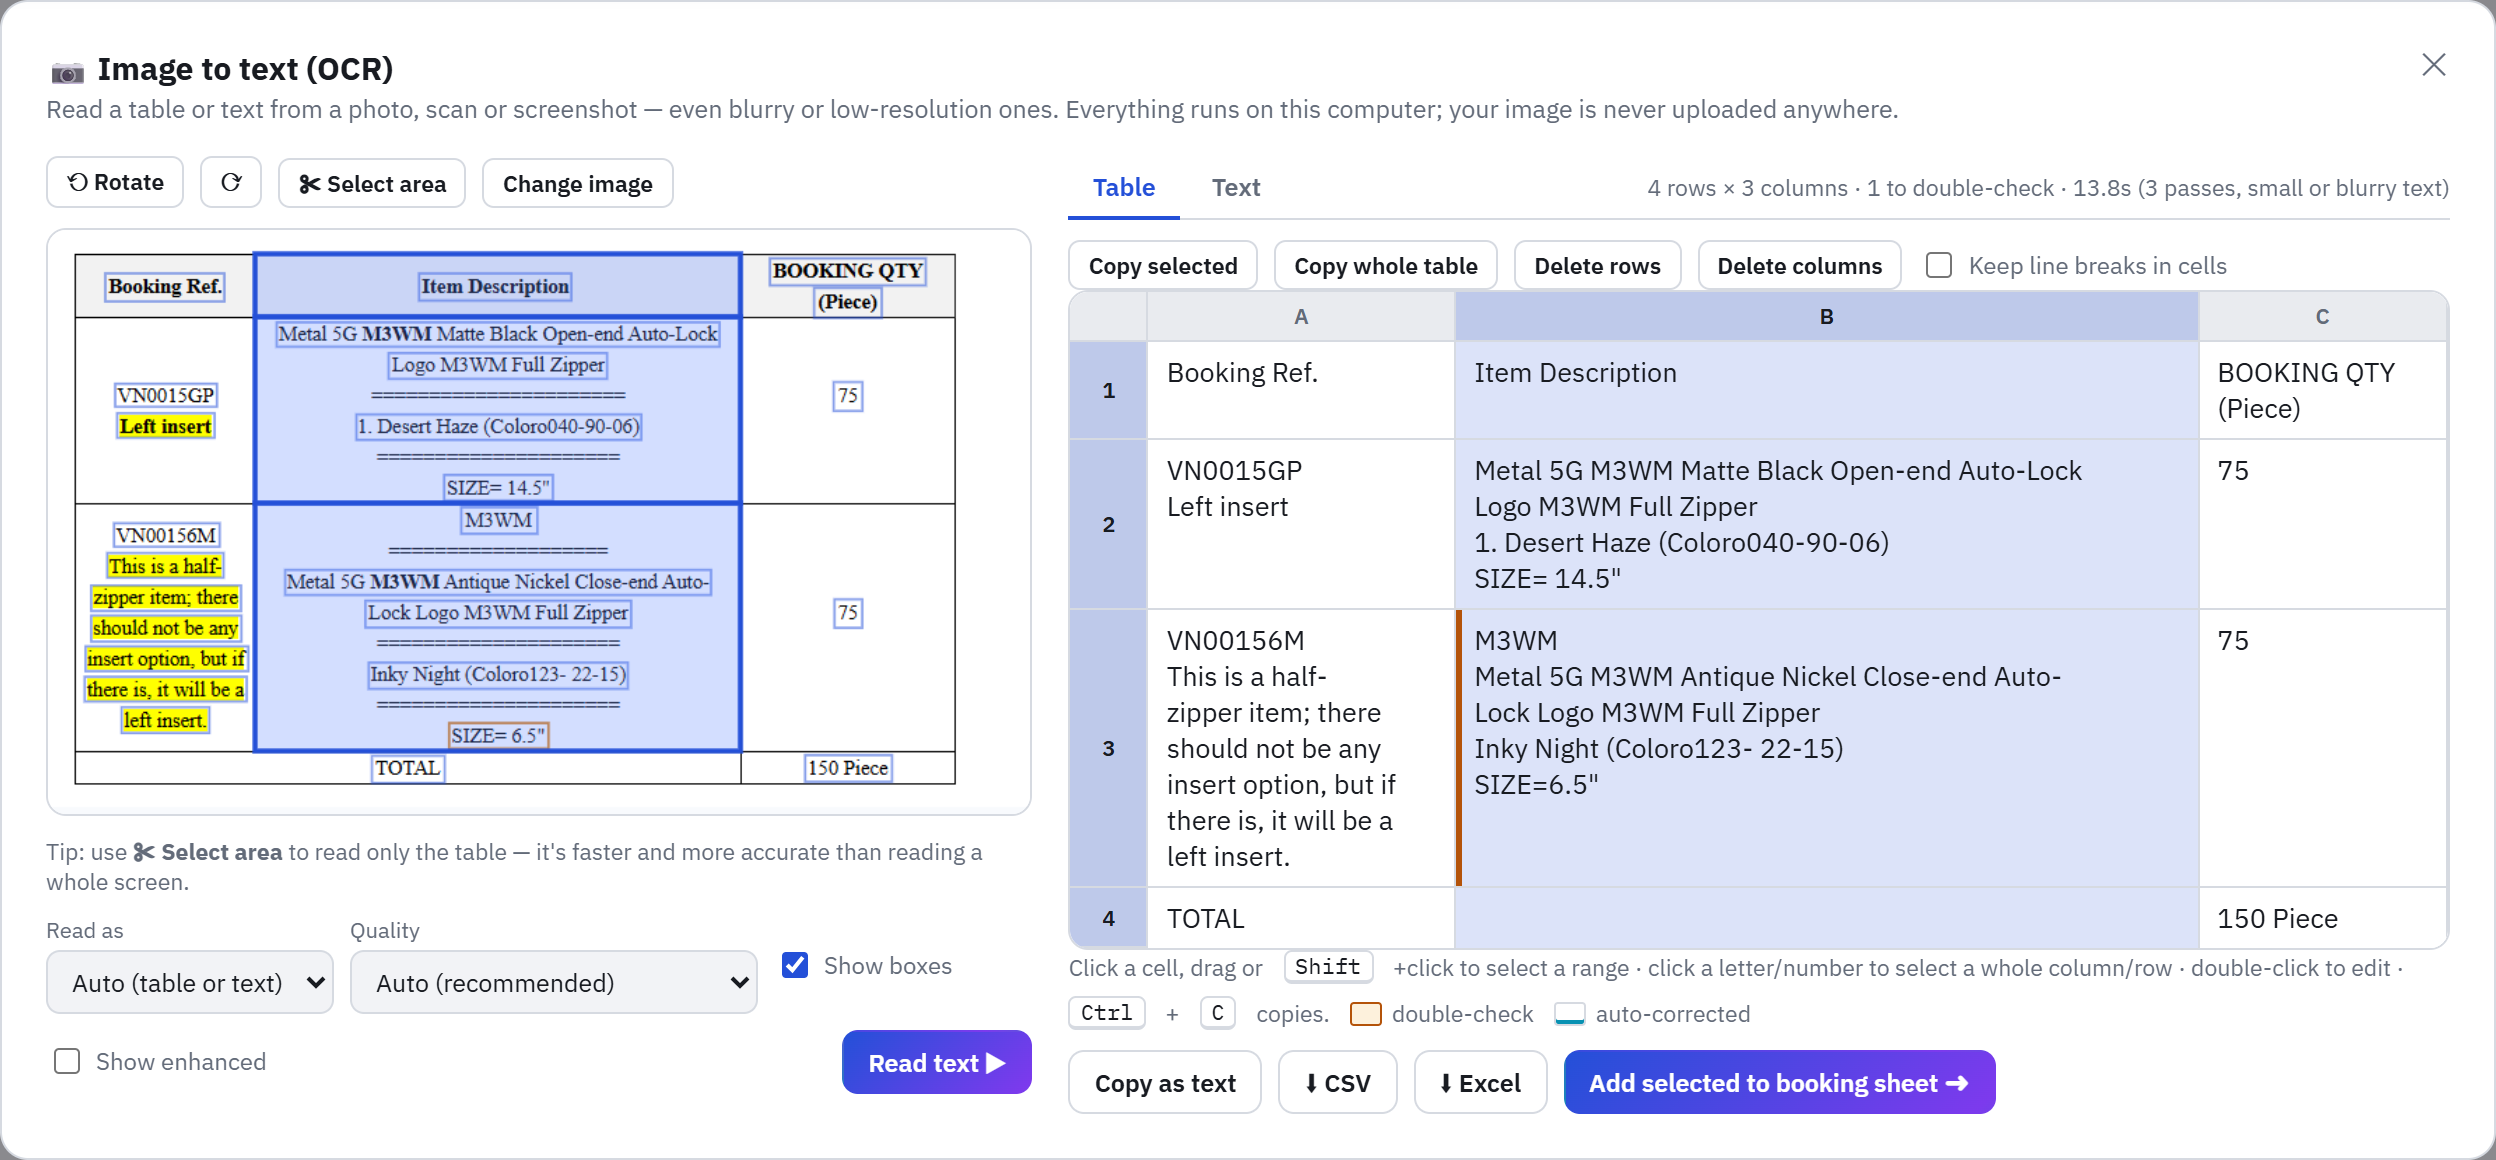
Tips: if the picture has lots of other things around the table, click ✂ Select area and draw a box around just the part you want — it's faster and more accurate. Use the rotate buttons if a photo is sideways. For the best result from a blurry screen, zoom in before taking the screenshot.
The reading models are bundled with this page, so OCR works even with no internet at all. Just a small helper script loads fresh from the internet each time you open the page (a few seconds, one time per visit). Your image is never uploaded anywhere — all the reading happens on your own computer.
9. Reordering rows
Every row has a ⠿ handle on its left. Click and hold it, then drag the row up or down to put it where you want.
10. Choosing which columns show, and their order
Next to the "Booking / PR sheet" title is a switch labelled Custom column order. Flip it on and the columns rearrange to a more useful order automatically.
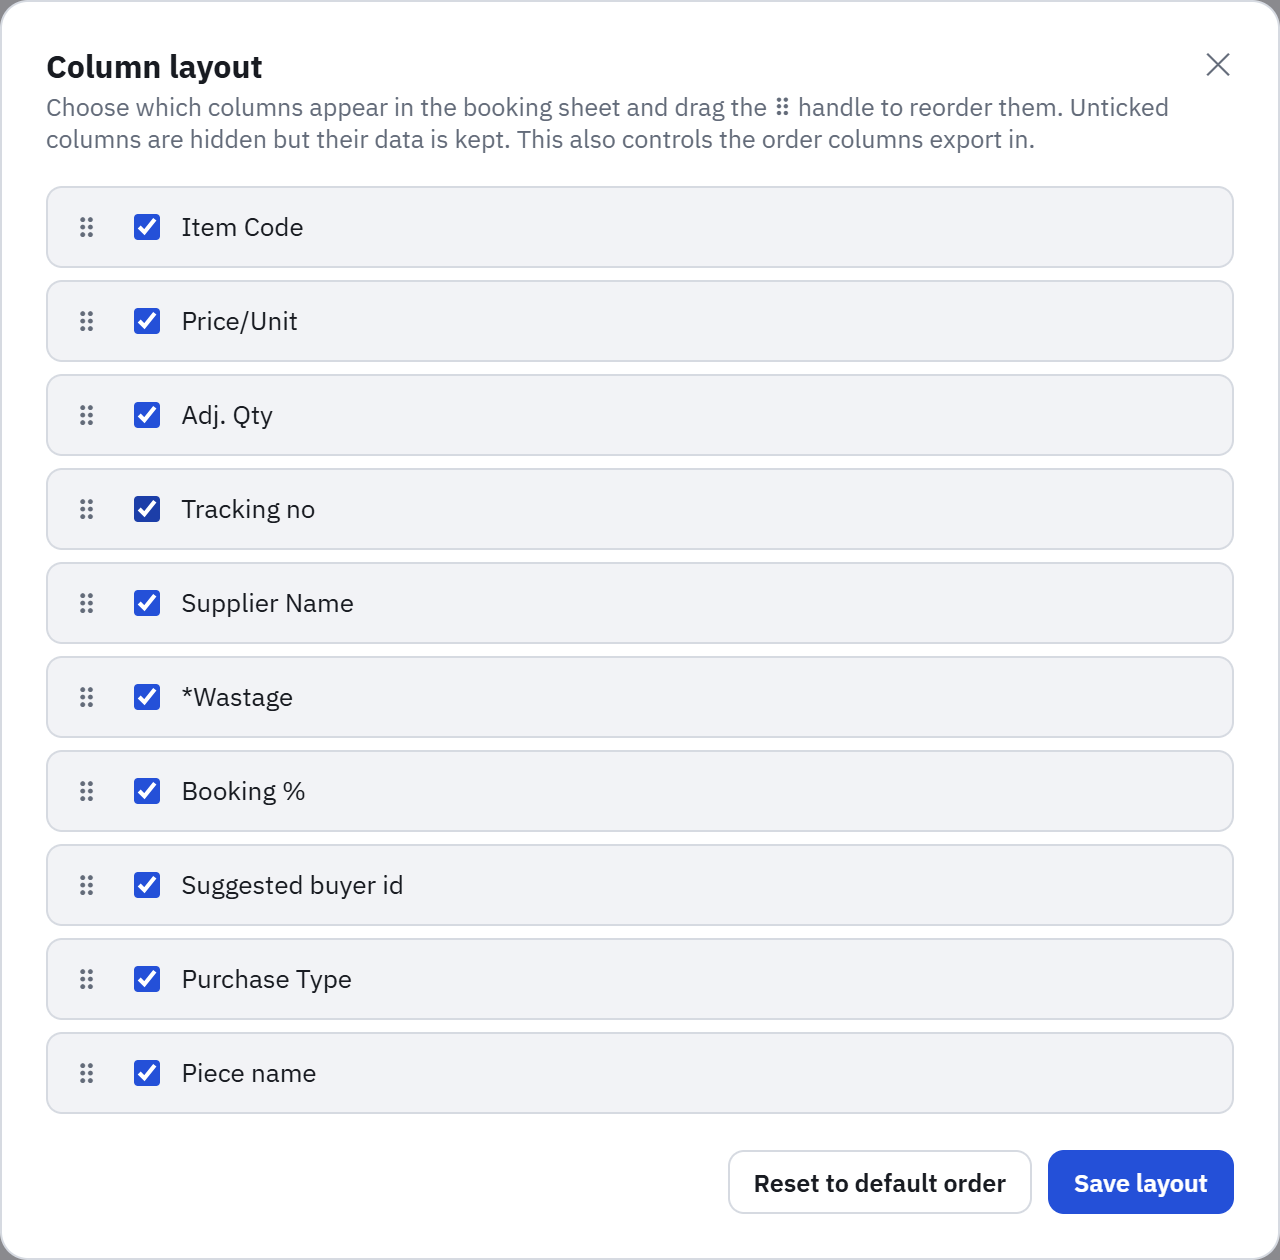
Want a different order, or want to hide a column you never use? Click ⚙ Customize order. Drag the ⠿ handles to rearrange, untick a box to hide that column, then click Save layout. Your sheet — and anything you export — will always use this order while the switch is on.
11. Seeing what an item code actually is
Hover your mouse over any Item Code box in the sheet (or click into it) — a small popup appears showing that item's Goods Name and full Description, so you can double check it's the right one without leaving the sheet.

12. Auto-fill defaults — set it once, stop retyping it
If you type the same thing into the same box over and over — like Purchase Type always being "Generic", or Production Area always being "Stitching" — set it as a default once, and never type it again.
Step 1 — Click ⚙ Auto-fill defaults at the top of the page. Fill in only the boxes you want to default — leave the rest empty. Click Save defaults.
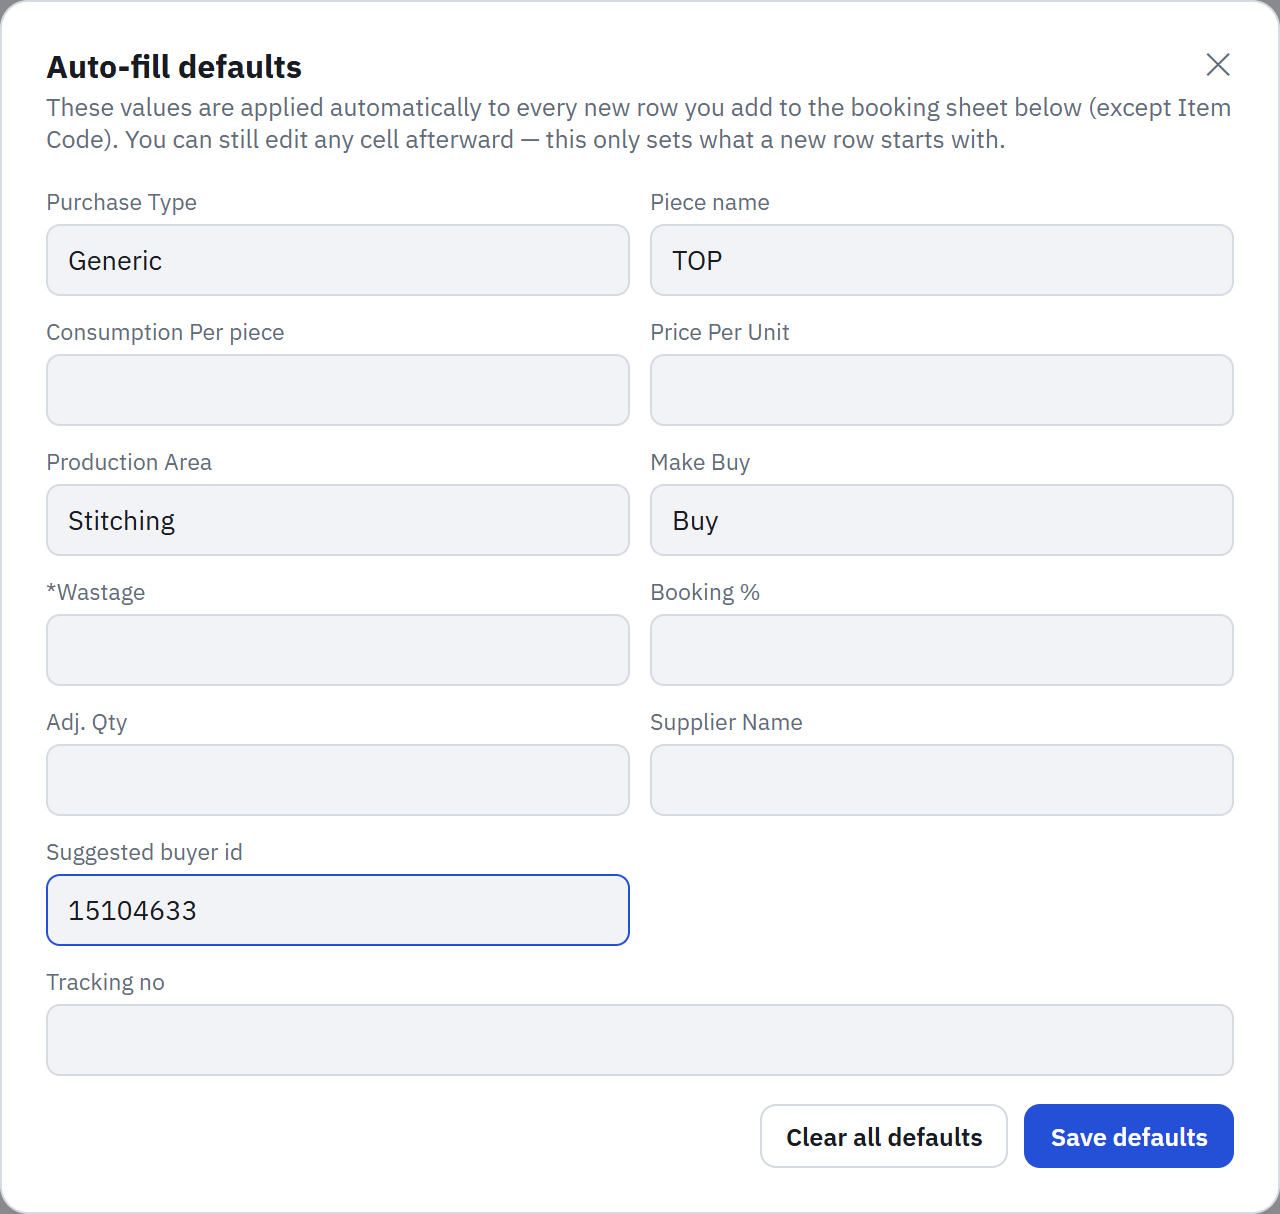
Step 2 — From now on, any box you left empty in Step 1 fills in by itself whenever a row needs it:
- Click Add on a search result, or click + Add row — the new row starts with your defaults already in place.
- Paste a list or a table — if a pasted box is empty, your saved default shows through instead of leaving it blank.
Only the boxes you actually typed into stay blank by default — for example, Item Code is never auto-filled, since every item needs its own code.

Also at the top of the page: type your Buyer ID and click Save — that's a quick shortcut for the same "Suggested buyer id" default, without opening the full dialog.
None of this touches rows already on your sheet — only new ones, from the moment you save.
13. Exporting your sheet
Click Export CSV or Export Excel above the sheet to download everything as a file you can open, email, or upload elsewhere.

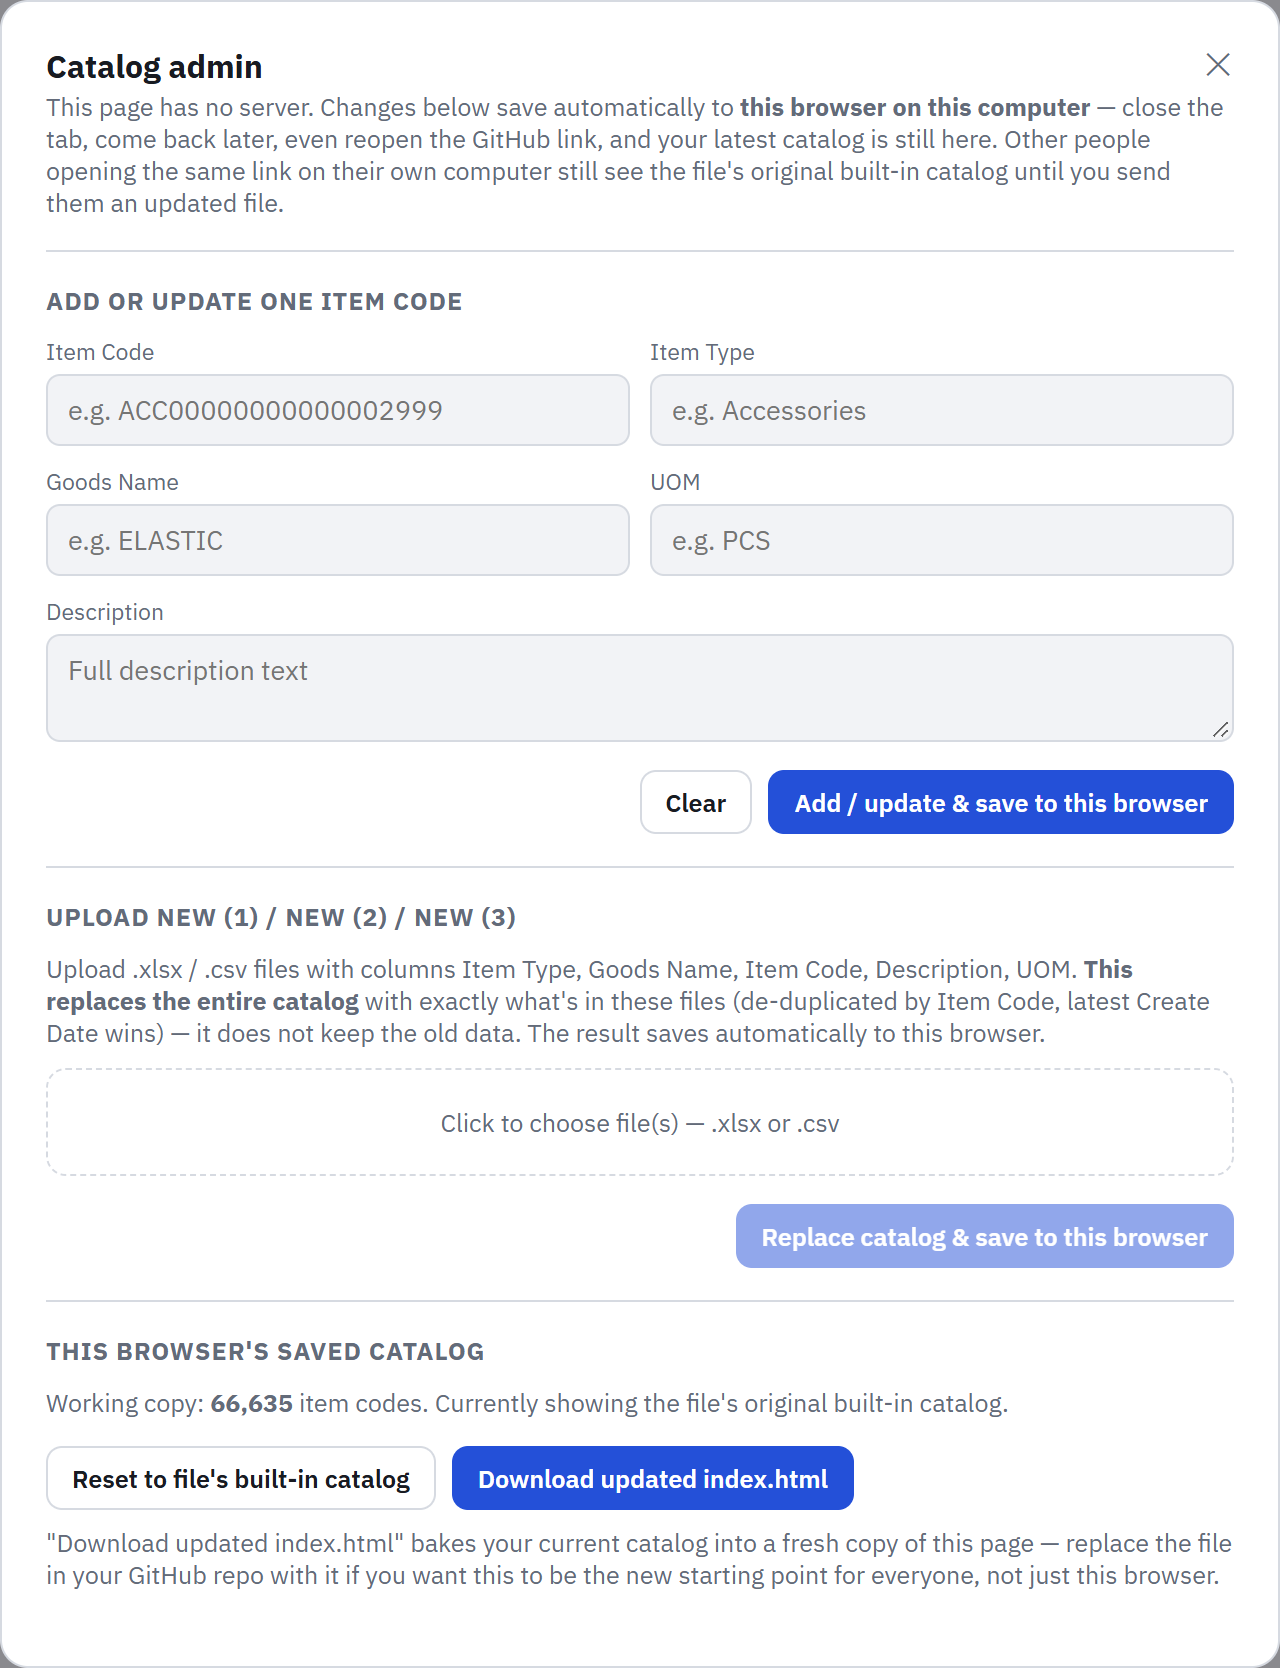
14. Admin: adding item codes or updating the whole catalog
The small admin link at the very bottom is only for updating the item code list itself (not your booking sheet). You can add one code manually, or upload updated files to replace the whole list.
Anything you change here is saved to this browser, on this computer, only — it won't show up for anyone opening the link on their own computer unless you send them an updated file.